Amazon S3 Export
Feature availability
This feature is available in all accounts, including accounts with free plans.
Often, business needs dictate that you analyze behavioral data alongside other organizational sources of data that aren't captured within Amplitude. By integrating Amplitude with Amazon S3, you can export your Amplitude data to an Amazon S3 bucket. This enables you to analyze your Amplitude data sets side-by-side with the rest of your data.
Because the export works on a per-project basis, you have the flexibility to set up data from one project for delivery to multiple buckets. Or, you can use multiple projects in the same organization to export event data into a single Amazon S3 bucket. Amplitude limits bucket access to a single organization.
Other Amplitude + Amazon S3 Integrations
This integration sends Amplitude data to Amazon S3. Amplitude offers two other integrations with Amazon S3:
Considerations
- You can't use portfolio projects as data sources for the Amazon S3 export.
- You can't reuse bucket names across Amplitude organizations, but you can reuse bucket names across projects in the same organization. If you migrate organizations, disable or delete the Amazon S3 destination in the old organization before you create it in the new organization.
- The export finishes within one hour after the currently exported hour. The export time is typically between one and 10 minutes.
- The only potential error is an accessibility error. This can happen if you have changed any configurations on the receiving end and Amplitude is unable to access to your bucket. In this case, the export fails after several tries, and Amplitude notifies the administrator and user who created the export by email.
- The error email includes troubleshooting information. This information isn't available within the Amplitude UI. Because accessibility is the only error possible, the email includes information on which permission is missing.
- There isn't a size or date range limit when backfilling historical event data via manual exports. If you can't export a certain date range, first confirm that you have event data for that date range. Then submit a ticket to the support team.
Set up the integration
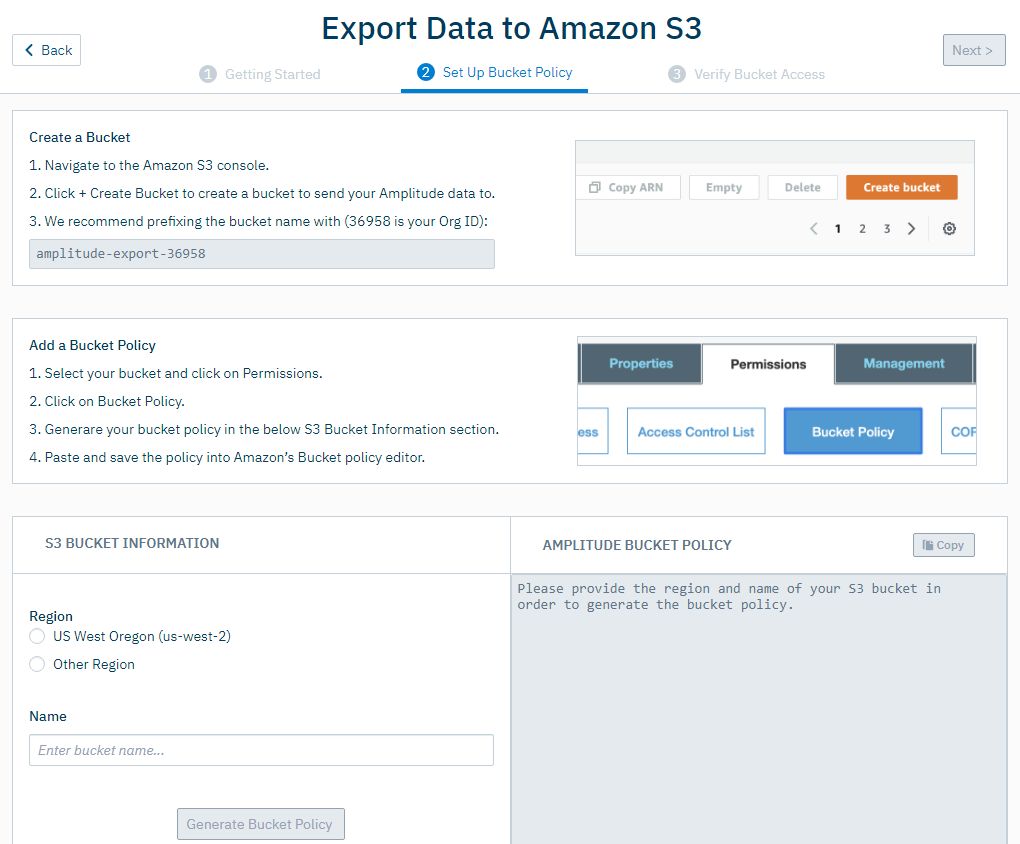
To set up the Amazon S3 integration, follow these steps:
- In Amplitude Data, click Catalog and select the Destinations tab.
- In the Warehouse Destination section, click Amazon S3.
- Choose which data you'd like to include in this export: Export events ingested today and moving forward, Export all merged Amplitude IDs, or export both. For events, you can also specify filtering conditions to only export events that meet certain criteria.
- Click Next.
-
In the Set Up Bucket Policy tab, go through the steps listed in the Create a Bucket and Add a Bucket Policy sections. Then fill out the required information in the S3 Bucket Information section.
-
Click Generate Bucket Policy, then click Next.
Amplitude verifies your bucket access. After access is verified, Amplitude immediately starts hourly exports.
After setup is complete, check the status of your exports from the integration.
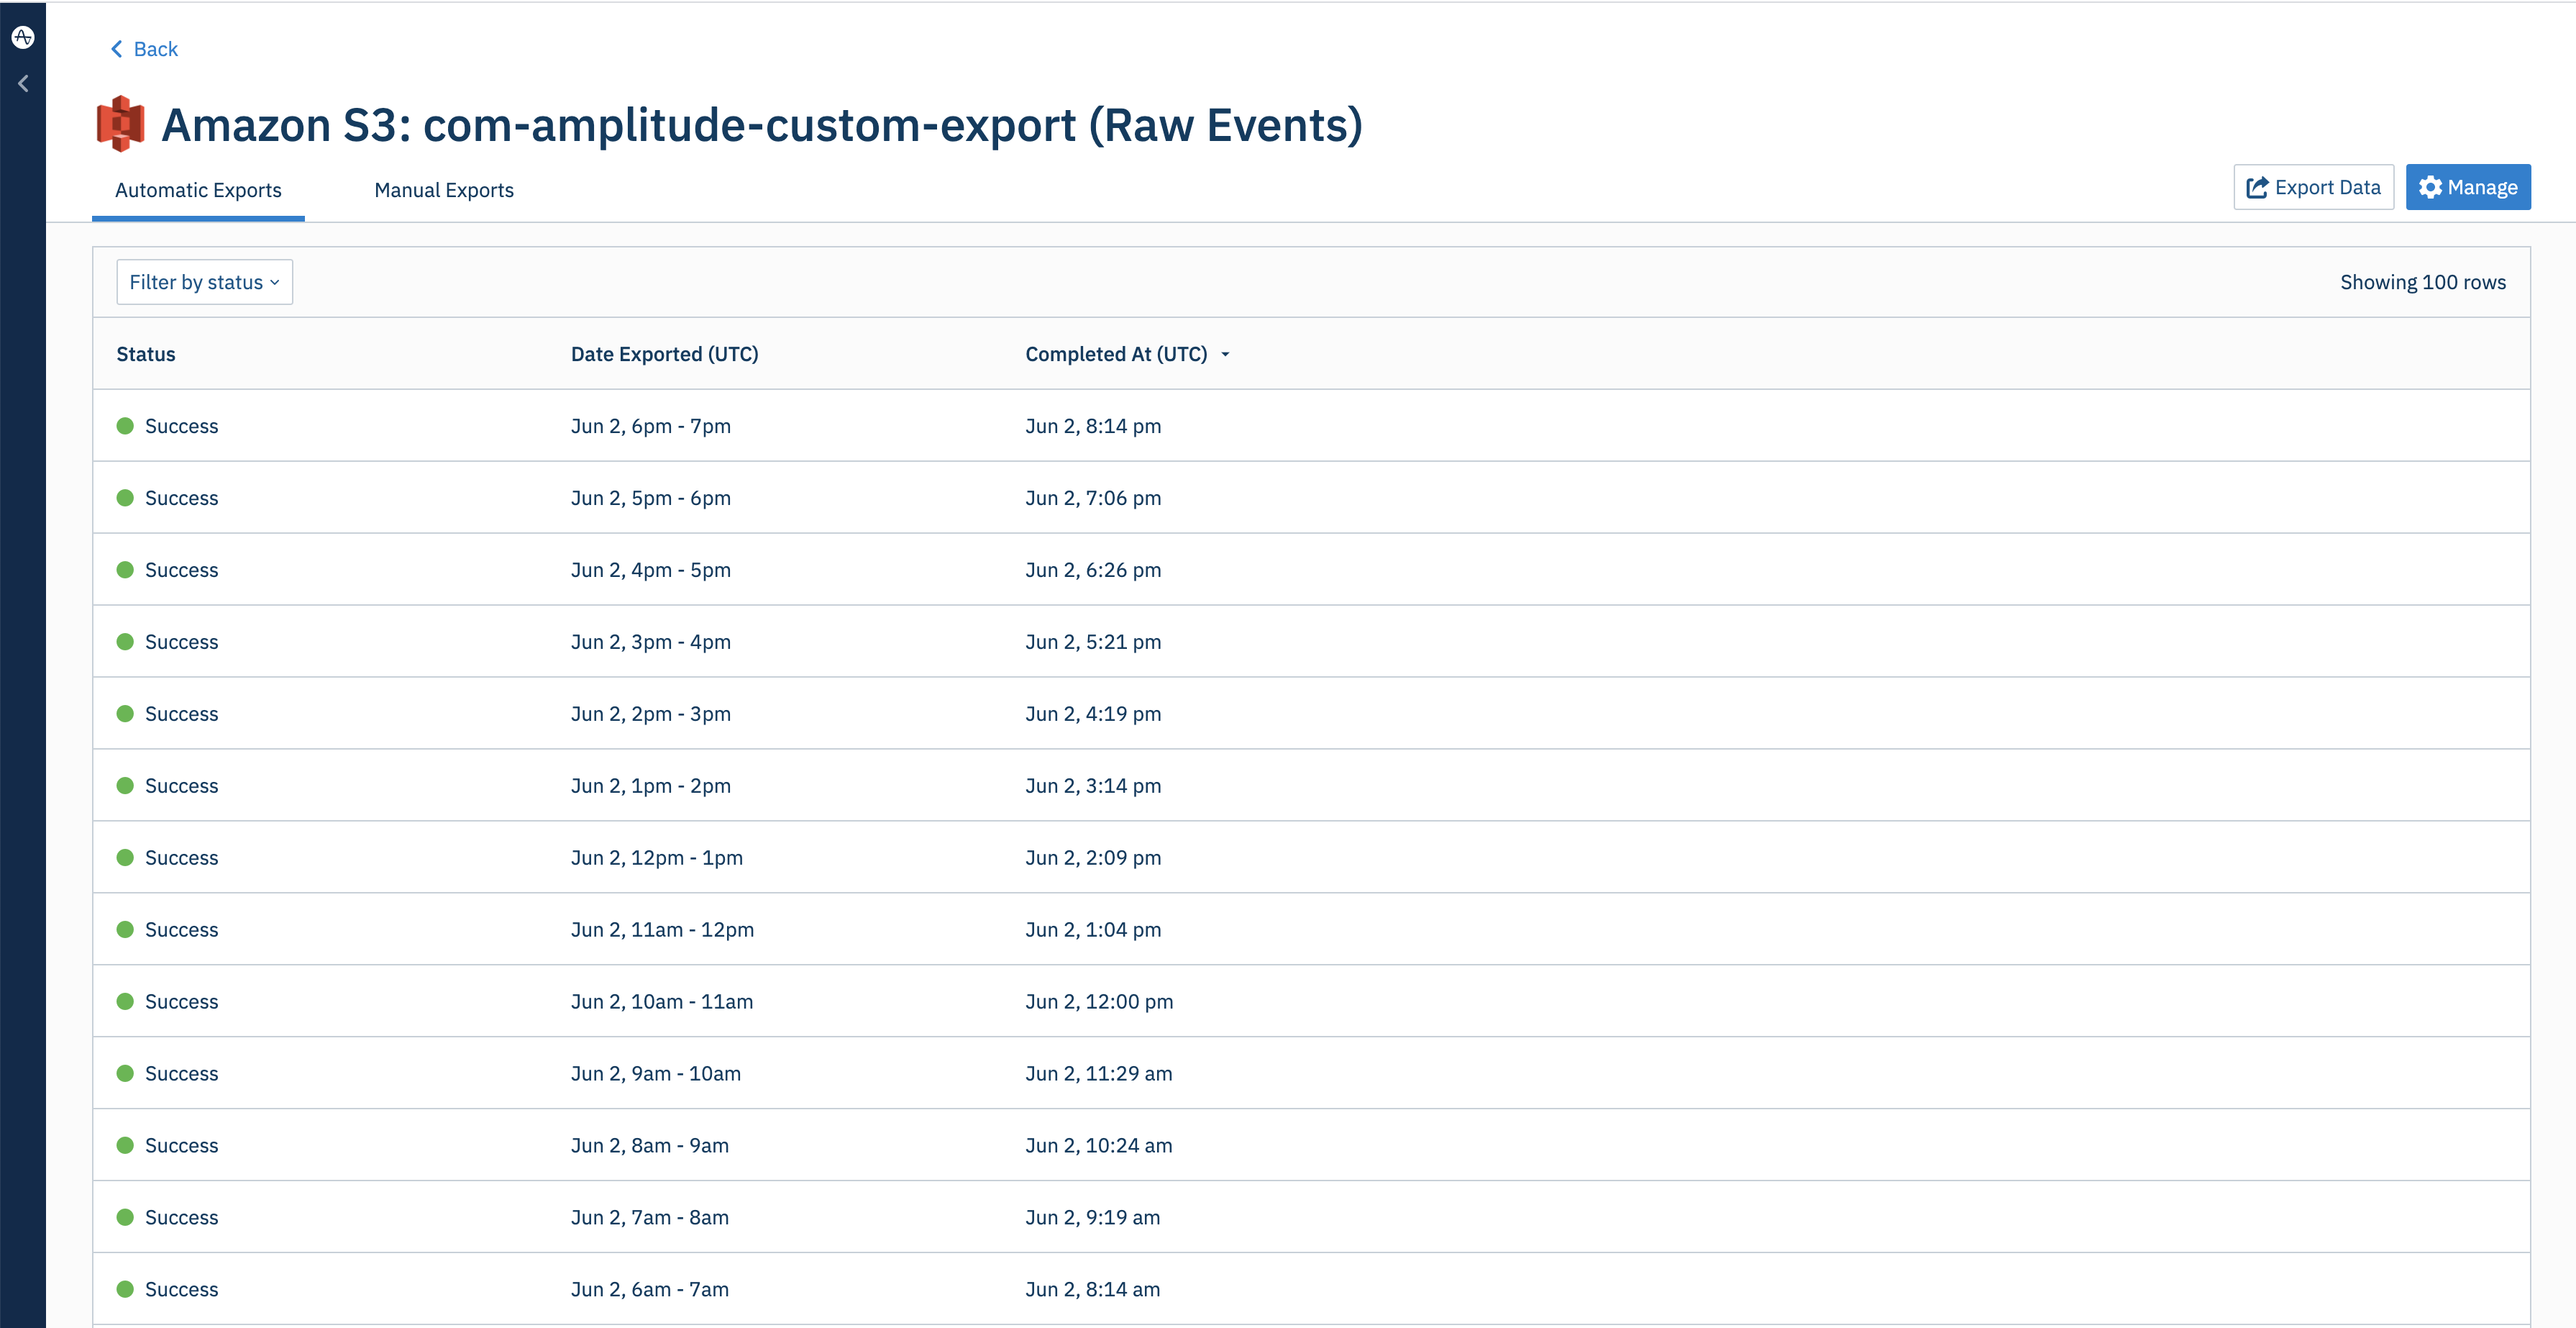
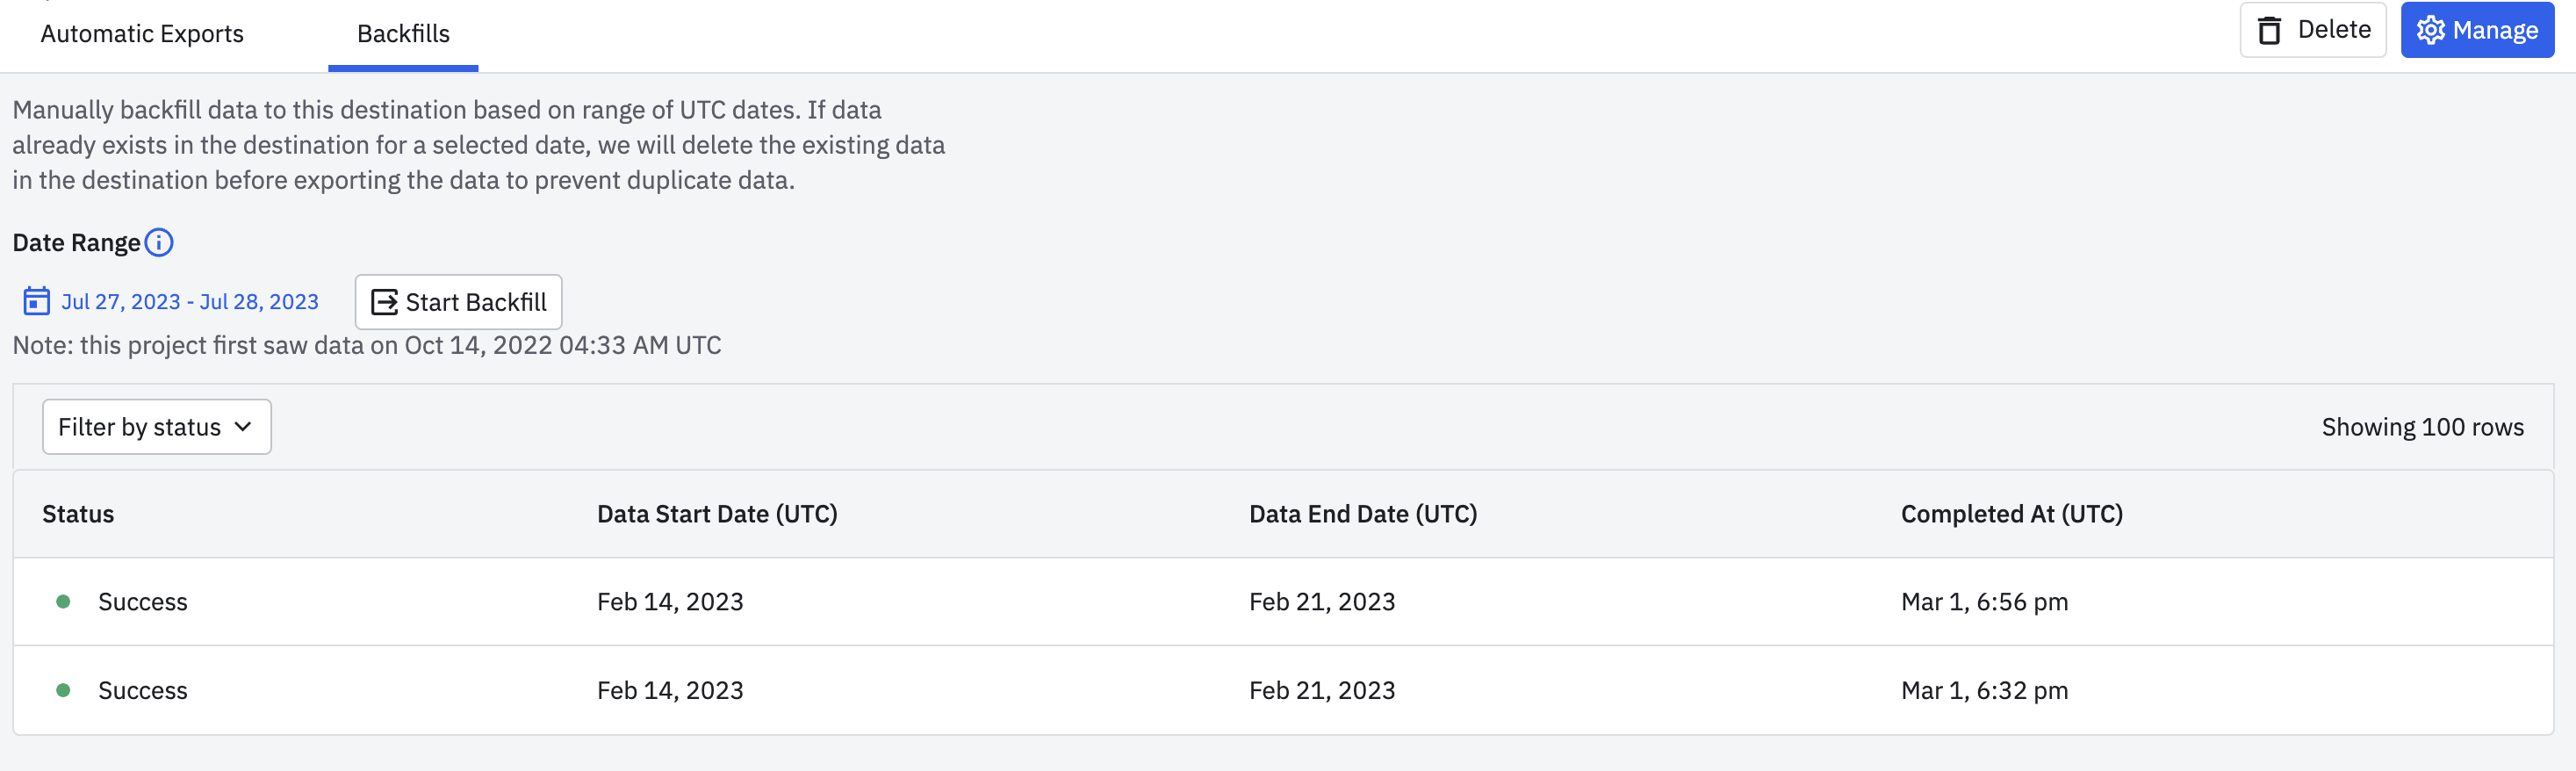
Run a manual export
You can backfill historical data to S3 by manually exporting data.
- Go to the Google Cloud Storage export connection page created in the section above.
- Go to Backfills tab.
- Select the desired date range.
- Click Start Backfill.
If the backfill range overlaps with the range of already exported data, Amplitude de-duplicates overlapping data.
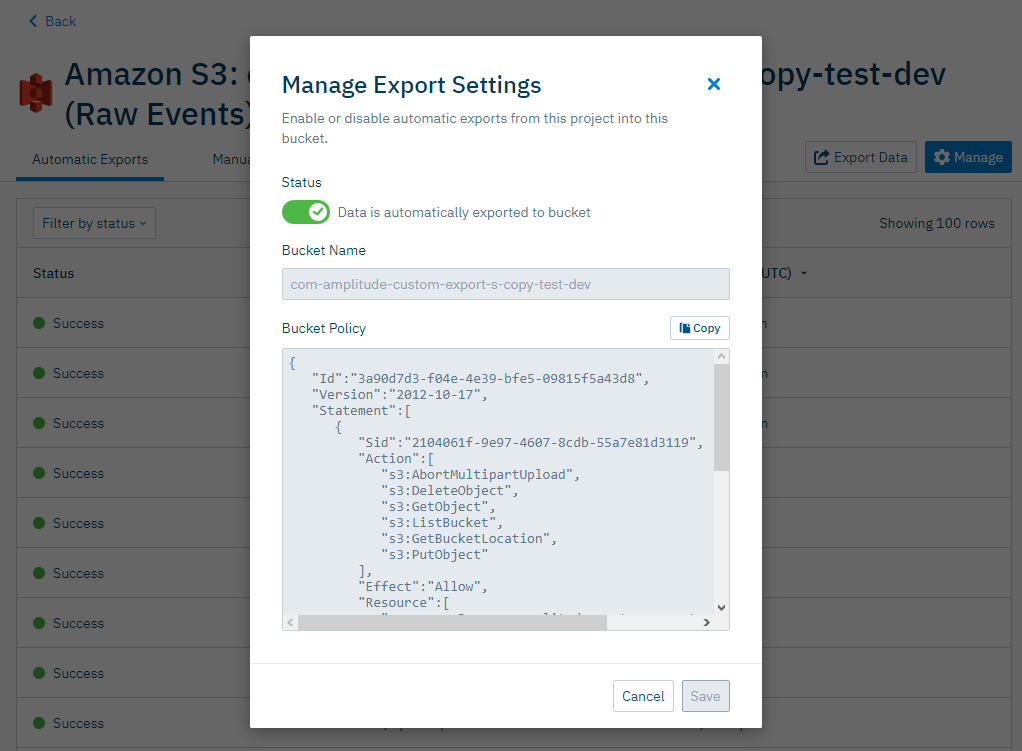
Disable automatic exports
To disable automatic exports, open the integration and click Manage. You can toggle exports from the Manage Export Settings modal.
Exported data format
Event table schema
Column |
Type | Description |
|---|---|---|
$insert_id |
string | A unique identifier for the event. Amplitude deduplicates subsequent events sent with the same device_id and insert_id within the past 7 days. |
amplitude_attribution_ids |
array | The hashed attribution ids on the event. |
amplitude_id |
long | The original Amplitude ID for the user. Use this field to automatically handle merged users. Example: 2234540891 |
app |
int | The Project ID found in your project's Settings page. Example: 123456 |
city |
string | City. Example: “San Francisco” |
client_event_time |
timestamp | Local timestamp (UTC) of when the device logged the event. Example: 2015-08-10T12:00:00.000000 |
client_upload_time |
timestamp | The local timestamp (UTC) of when the device uploaded the event. Example: 2015-08-10T12:00:00.000000 |
country |
string | Country. Example: "United States" |
data |
dict | Dictionary where certain fields such as first_event and merged_amplitude_id are stored |
device_carrier |
string | Device Carrier. Example: Verizon |
device_family |
string | Device family. Example: Apple iPhone |
device_id |
string | The device specific identifier. Example: C8F9E604-F01A-4BD9-95C6-8E5357DF265D |
device_type |
string | Device type. Example: Apple iPhone 5s |
dma |
string | Designated marketing area (DMA). Example: San Francisco-Oakland-San Jose, CA |
event_id |
int | A counter that distinguishes events. Example: 1 |
event_properties |
dict | A dictionary of key-value pairs that represent data to send along with the event. You can store property values in an array |
event_time |
timestamp | Amplitude timestamp (UTC) which is the client_event_time adjusted by the difference between server_received_time and client_upload_time, specifically: event_time = client_event_time + (server_received_time - client_upload_time) Amplitude uses this timestamp is used to organize events on Amplitude charts. NOTE: If the difference between server_received_time and client_upload_time is less than 60 seconds, the event_time isn't adjusted and equals the client_event_time. Example: 2015-08-10T12:00:00.000000 |
event_type |
string | Event type |
group_properties |
dict | A dictionary of key-value pairs that represent properties tied to the groups listed in the "groups" field. This feature is available to customers with Accounts add-on |
groups |
dict | Group types. See the Accounts documentation for more information |
idfa |
string | (iOS) Identifier for Advertiser |
ip_address |
string | IP address. Example: "123.11.111.11" |
language |
string | The language set by the user |
library |
string | Library used to send the event. Example: amplitude-ios/3.2.1, http/1.0 |
location_lat |
float | Latitude. Example: 12.3456789 |
location_lng |
float | Longitude. Example: -123.4567890 |
os_name |
string | OS name. Example: ios |
os_version |
string | OS version. |
paying |
boolean | True if the user has ever logged any revenue, otherwise (none). Modify this property with the Identify API. |
platform |
string | Platform of the device |
processed_time |
timestamp | Amplitude timestamp when an event was processed by our processing systems |
region |
string | Region. Example: California |
sample_rate |
null | The number of samples taken. This feature is available to customers with Scale add-on |
server_received_time |
timestamp | Amplitude timestamp (UTC) when Amplitude's servers receive the event |
server_upload_time |
timestamp | Amplitude timestamp (UTC) when Amplitude's ingestion system ingests the event. Example: 2015-08-10T12:00:00.000000 |
session_id |
long | The session start time in milliseconds since epoch. Example: 1396381378123 |
start_version |
string | App version the user was first tracked on. Example: 1.0.0 |
user_id |
string | A readable ID specified by you. Should be something that doesn't change; for that reason, using the user's email address isn't recommended. |
user_properties |
dict | A dictionary of key-value pairs that represent data tied to the user. You can store property values in an array |
uuid |
UUID | A unique identifier per row (event sent). Example: bf0b9b2a-304d-11e6-934f-22000b56058f |
version_name |
string | The app version. Example: 1.0.0 |
Raw event file and data format
Data is exported hourly as zipped archive JSON files, and partitioned by the hour with one or multiple files per hour. Each file contains one event JSON object per line.
File names have the following syntax, where the time represents when the data was uploaded to Amplitude servers in UTC (for example, server_upload_time):
projectID_yyyy-MM-dd_H#partitionInteger.json.gz
For example, the first partition of data uploaded to this project, on Jan 25, 2020, between 5 AM and 6 PM UTC, is in the file:
187520_2020-01-25_17#1.json.gz
Here is the exported data JSON object schema:
{
  "server_received_time": UTC ISO-8601 timestamp,
  "app": int,
  "device_carrier": string,
  "$schema":int,
  "city": string,
  "user_id": string,
  "uuid": UUID,
  "event_time": UTC ISO-8601 timestamp,
  "platform": string,
  "os_version": string,
  "amplitude_id": long,
  "processed_time": UTC ISO-8601 timestamp,
  "user_creation_time": UTC ISO-8601 timestamp,
  "version_name": string,
  "ip_address": string,
  "paying": boolean,
  "dma": string,
  "group_properties": dict,
  "user_properties": dict,
  "client_upload_time": UTC ISO-8601 timestamp,
  "$insert_id": string,
  "event_type": string,
  "library":string,
  "amplitude_attribution_ids": string,
  "device_type": string,
  "device_manufacturer": string,
  "start_version": string,
  "location_lng": float,
  "server_upload_time": UTC ISO-8601 timestamp,
  "event_id": int,
  "location_lat": float,
  "os_name": string,
  "amplitude_event_type": string,
  "device_brand": string,
  "groups": dict,
  "event_properties": dict,
  "data": dict,
  "device_id": string,
  "language": string,
  "device_model": string,
  "country": string,
  "region": string,
  "is_attribution_event": bool,
  "adid": string,
  "session_id": long,
  "device_family": string,
  "sample_rate": null,
  "idfa": string,
  "client_event_time": UTC ISO-8601 timestamp,
 }
Exported data size
The size and volume of exported data depends on how you instrument data, and the number of events you send to Amplitude. Amplitude can't provide exact estimates, but you can use your average event size to provide a rough estimate:
- Download a few hourly files with the Export API.
- Compare the number of events to the size of the zip file to estimate average event size.
- Create an Event Segmentation chart and multiply by the average event size to estimate the total event volume per month.
'Complete' files
Amplitude may label some files in your export as complete. These labels help you decide if there is no data in the time frame or if the data in your time frame didn't export.
If you see a complete file for a time frame with no data, there is no data to export for the selected time frame.
To disable complete files, contact Amplitude Support.
Merged Amplitude IDs file and data format
Data is exported hourly as zipped archive JSON files. Each file contains one merged Amplitude ID JSON object per line.
File names have the following syntax, where the time represents when the data was uploaded to Amplitude servers in UTC (for example server_upload_time):
-OrgID_yyyy-MM-dd_H.json.gz
For example, find data uploaded to this project, on Jan 25, 2020, between 5 PM and 6 PM UTC, in the file:
-189524_2020-01-25_17.json.gz
Merged ID JSON objects have the following schema:
{
 "scope": int,
 "merge_time": long,
 "merge_server_time": long,
 "amplitude_id": long,
 "merged_amplitude_id": long
}
Update bucket policy for S3 exports to use KMS encryption
The following outlines the procedure to enable KMS encryption in AWS S3 buckets for existing export connections. This encryption improves security posture.
Migration steps
Before starting the migration, users must have access to the following:
- Credentials to access their existing Amplitude exports
- Appropriate permissions to update S3 bucket configuration and create KMS keys.
How to update existing export to use KMS encryption:
- Create a KMS key in your AWS account by following the AWS KMS Developer Guide.
- Log in to your Amplitude account and navigate to the existing S3 export that you want to migrate.
- In the manage settings model change the toggle to disable to turn off the export. Wait for all in-progress export jobs to complete to avoid unexpected results when you create a new S3 export connection.
- Create a new S3 export by following the Amplitude S3 Export Setup Guide.
- In the export connection setup flow, generate the updated bucket policy and the KMS policy. The updated policy contains a new AWS IAM Role principal to trust.
- Backup the current bucket policy in your S3 bucket in AWS for rollback procedure if needed.
- Update the S3 bucket policy and KMS key policy you generated in Step 5 in your AWS account.
- Update the S3 bucket to use KMS encryption as mentioned in the AWS S3 Developer Guide.
- Click
Nextto verify Bucket Access and create a new connection in the export setup flow. - Wait for the new export to complete. Once it's finished, you can verify that your data is being exported to the provided S3 bucket with the new policy.
- Once you verify your data exports successfully, delete the old S3 export connection, which you disabled in Step 2.
Rollback procedure
Note
Once you delete the old S3 export connection, the rollback process mentioned below is not applicable.
In case something goes wrong in the middle of the migration procedure mentioned above, do the following:
- Ensure that the newly created S3 Export connection is removed.
- Revert the bucket policy to trust the AWS account root principal (the policy, which was backed up in Step 6 above).
- Revert the bucket encryption to the previous configuration, which was changed in Step 8.
- Re-enable the current S3 export connection, which was disabled in Step 3.
- (Optional) Delete the KMS key created in Step 1.
FAQ
Will there be any export data loss after the migration?
After disabling and removing the S3 export connection, the data already exported to the S3 destination bucket won’t be removed.
However, the metadata, like export jobs history, will be lost.
Will there be any gaps in data export during the migration?
As long as the new S3 export connection is created within 24 hours after the old S3 export connection is disabled, there won’t be any gaps in data export.
What should I do if the new export connection is created 24 hours after the old connection is disabled?
In case the new export connection was created 24 hours after the old connection is disabled and there is a gap in data export, use manual backfill functionality to fill data for missing date range. Backfill export will ensure no duplication in exported data even if the backfill date range overlaps with the previously exported date range.
What are the consequences of not migrating?
Less restricting access scope for your destination S3 bucket through (current state) trusting an AWS account root principal instead of (future state) AWS IAM Role principal. That AWS IAM Role is specific to Amplitude Project ID, in which the new S3 export connection is created.
Will it be possible to roll back to the previous bucket policy?
No. Once the old S3 export connection is removed, it will no longer be possible to set up S3 export with the AWS account root principal as a trustee in the bucket policy.