Create a Cohort Syncing Integration
Prework requirements
This guide assumes that you've completed the prerequisites for building partner integrations listed in Amplitude Integration Portal
This guide walks through the basics of creating a cohort syncing integration with Amplitude.
This doc uses a list-based integration in its examples. If you create a property-based cohort integration, some steps may be slightly different than you see here.
Connection information
You must add connection information before you can configure the specifics of your integration.
- Navigate to Settings > Developer Portal.
- Click Add Connection Info.
- Enter the connection info:
- Display Name: The display name of the integration. This is the name that appears in the Integration Catalog and on your integration tile.
- Category: Choose a category. The Integration Catalog uses the category in filters.
- Summary: A brief overview of your product.
- Full Description: Detailed description of your integration. Include some common use cases so users understand why they should use the integration.
- Integration Logo: Upload your integration logo in PNG format.
Integration setup
The first step is to configure the integration tile that appears on the Amplitude Destinations page after Amplitude has validated your integration. You also need to decide between a List-based cohort integration or a Property-based cohort integration. See this doc for more information.
- From the Integration Portal page (Settings > Developer Portal), click Add New Destination.
- Choose the target connection from the Select Connection Information dropdown*.
- Choose whether you are building a list-based or property-based cohort integration:
- List-based cohort integration: A list-based cohort integration works best if a cohort is represented as a list of user identifiers in the target system. The first sync requires a call to a list creation API, then subsequent calls to the add API and remove API keep the list membership up to date.
- Property-based cohort integration: A property-based cohort integration works best with systems that represent cohort membership as a custom user property, such as a boolean flag or a tag. Amplitude invokes the update API when cohort membership changes to update the user property. Although you don't need to use the list creation API, some manual steps may be required to create the customer user property.
- Click Next to configure the destination.
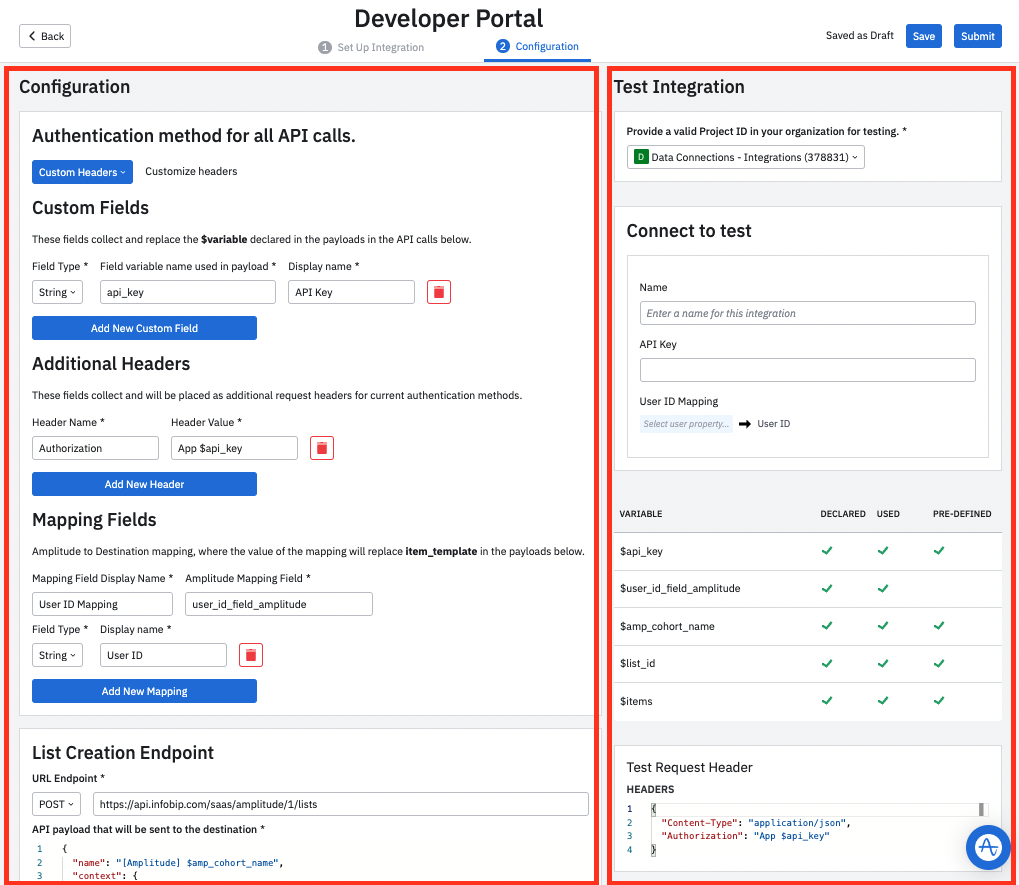
Configuration
The configuration page has two sections.
- The Configuration section on the left is where you configure your payload and what you expect to receive from Amplitude.
- The Testing Integration section summarizes your configurations, including your setup modal screen for your integrations, variables, and payload.
The next several sections walk through configuration and testing options.
Set authentication method
The first step is determining how you plan to authenticate the API call between Amplitude and your company.
Click Custom Headers, choose from the following:
- No authentication: No Authentication header is required.
- Basic Authentication: Use API key and API Secret (optional) as authentication headers.
- Authentication Header: Authenticate with API key.
- Bearer Token: User Bearer Token as an Authorization header.
Create custom fields
These fields collect and replace the $variable declared in the payloads in the API calls, and build the modal customers use to enable your integration. Fields you add here are required fields when your users set up the integration.
- Field Type: You can specify the field type (String, Single Select, Button Group)
- Field variable name used in the payload: By default, this matches your authentication choice. For example, if you choose Bearer Token as the authentication method, it's "bearer_token."
- Display name: The name your users see in the setup modal for your integration. By default, this matches your authentication choice. For example, if you choose Bearer Token as the authentication method, it has a placeholder display name called "Bearer Token."
- Add New Custom Field: If you need to add another identifier required for the payload, you can add custom fields such as String, Single Select, and Button Group.
Note
Amplitude recommends using an underscore "_" instead of a dash in the Header Values. for example, $api_key instead of $api-key.
Map fields
Map fields to specify how Amplitude fields connect to the fields in your system. The value of the mapping replaces item_template in the payloads.
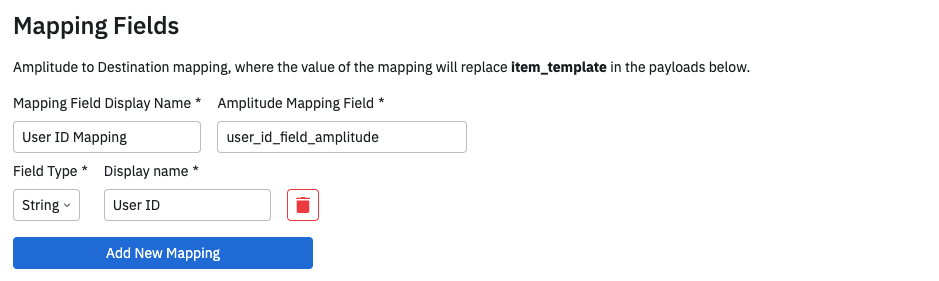
- Mapping Field Display Name: Amplitude recommends setting this as this as "Key," "Identifier," or "User ID Mapping."
- Amplitude Mapping Field: The field name in Amplitude. For example,
user_id_field_amplitude. - Field Type: Either "String" or "Single Select."
- Display name: This is fully customizable, so use something descriptive. For example, User ID or Email.
- Add New Mapping: Add more mappings if required such as String, Single Select, Button Group
Example: Bearer Token authorization (click to expand)
Here is an example for a simple configuration using Bearer Token authentication. The configuration on the left is used to the payload and the setup modal. On the right, the panel titled "Connect to Amplitude" shows the modal that the user sees when setting up your integration in Amplitude.

Example: Install modal using Basic Authentication (click to expand)
This is an example of what a built-out modal would look like in Amplitude after you've finalized your configuration. This would be part of the user's setup process when setting up your integration. Note this example shown is using "Basic Authentication".
Slugify Amplitude cohort name
You can slugify cohort names to standardize them. This is helpful if your system doesn't support special characters or foreign characters. This option converts your cohort name to a URL slug by replacing the Unicode special characters and spaces with ASCII and hyphens. This feature is only available when the variable $amplitude_cohort_name appears in the payload of the endpoints. The slugify rule is as follows:
- Convert the original cohort name to normalization form KD (NFKD), which is compatibility decomposition.
- Substitute hyphens for the characters except for the alphabets (a-z, A-Z), the numbers (0-9) and the underscores (_).
- Limit the slug to 100 characters.
Example
This option turns a cohort named Saturday's cohort & héllo to Saturday-s-cohort-he-llo
List creation endpoint
You need to call three different APIs for a list-based integration. The first one is the list creation endpoint. When a cohort syncs for the first time, Amplitude calls this API, and creates a list on your platform. Amplitude expects your app to send a response with the unique identifier for listID. From that response, Amplitude stores the listID uses the ID as part of the payload for list updates.
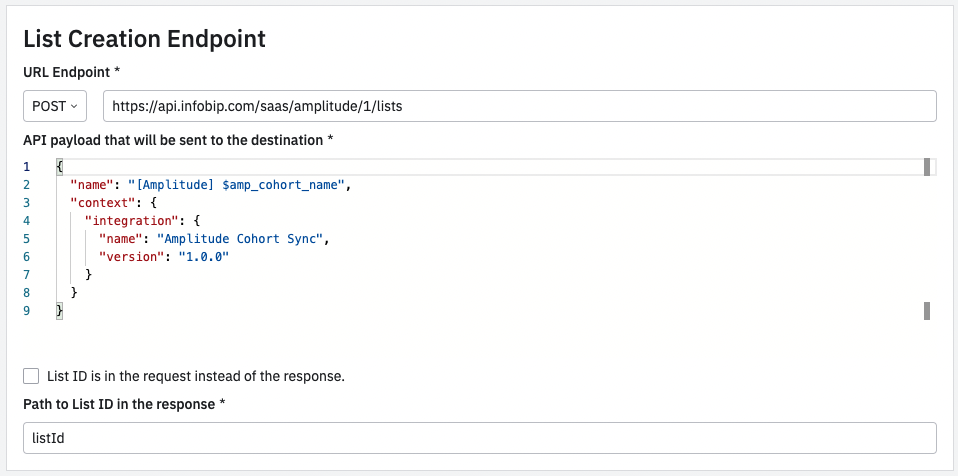
- URL Endpoint: This is the endpoint that you define. for example,
https://api.yourapp.com/list. Choose which method to use in the call. - API payload that to send to the destination: Customize and define this payload to fit your needs.
- Path to List ID in the response: N/A
Payload editor
The payload editor is a developer-friendly JSON editor tool. Type $ to find created variables easily.
Errors for the list creation endpoint
Add error status code and error messages for every endpoint so that end users can debug and get faster help.

Expand Error Classifications, and click Add New Error to add more status codes. Amplitude recommends including as many status codes and sub error codes (1) as you need to. These codes and messages make debugging much faster for your end users.
- Amplitude recommends using sub error codes if you use the same status code for multiple errors.
Here are some common examples of status codes that most partners include:
- 200: Success
- 400: Invalid request
- 401: Unauthorized (bad api_key)
- 404: Invalid User ID
- 429: Throttling/rate limiting
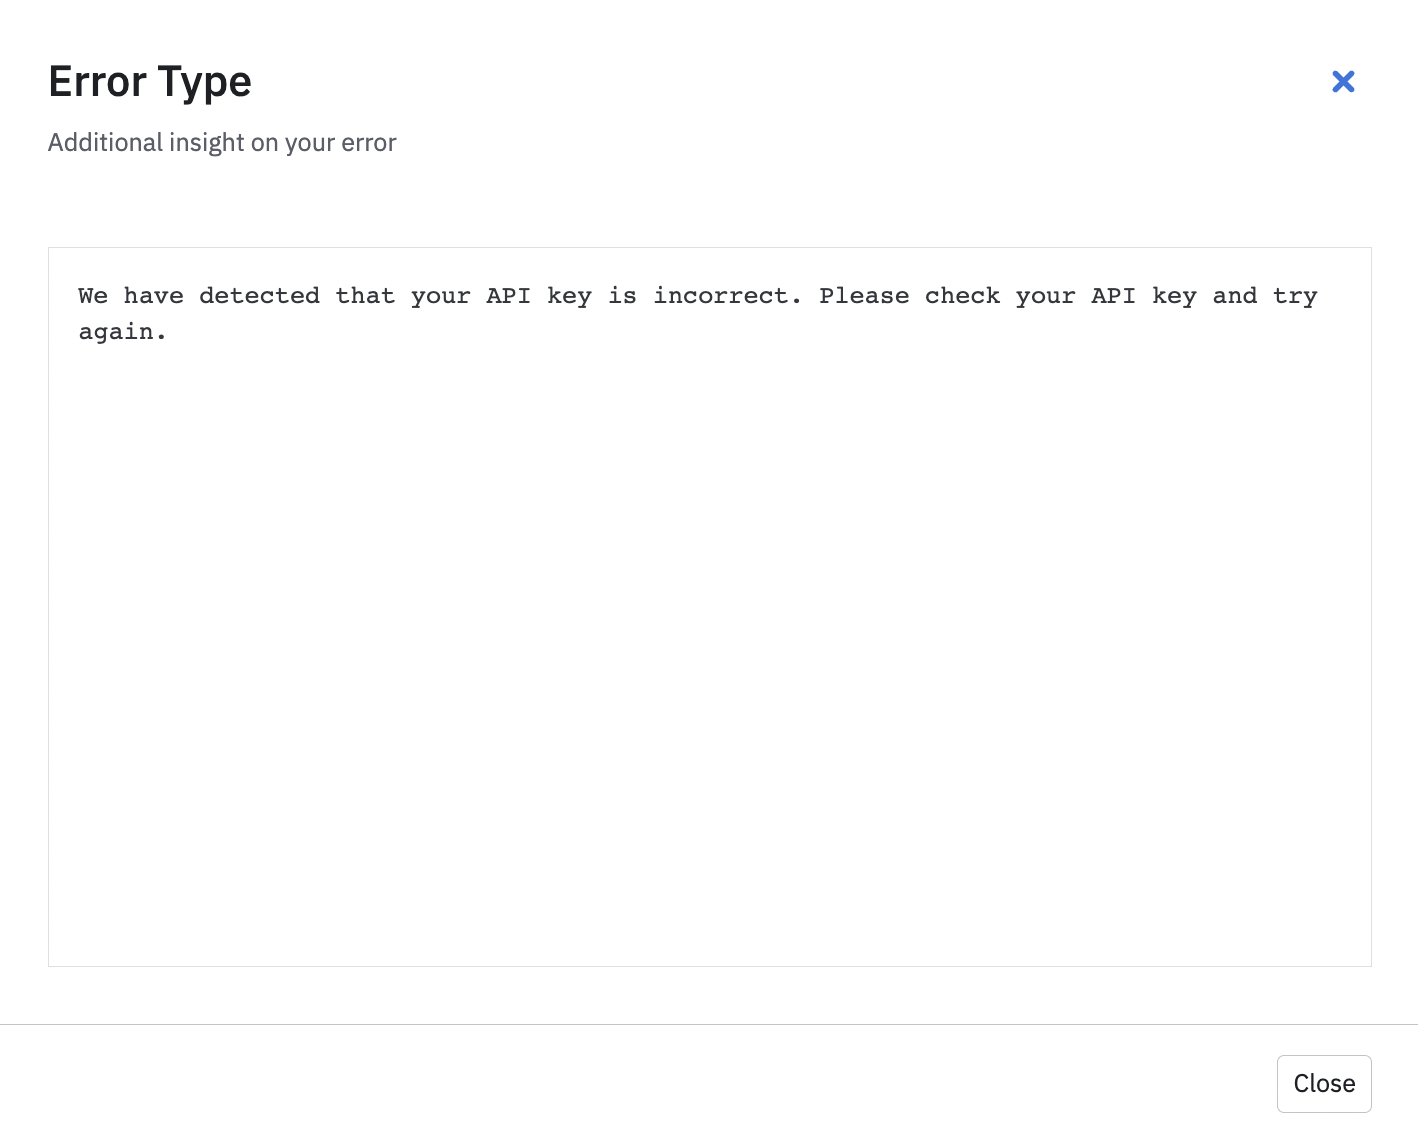
Amplitude highly suggests giving a clear Failure Reason (Description) and Error Message in case cohort sync fails. Clear messages drastically improve your end user's experience and can help deflect support issues and frustration.
API Key error
In this example, a user has added the wrong API key. The user can navigate to the cohort dashboard panel to investigate the errors in more detail after the cohort export to ModuleApps failed. The user is able to quickly understand that the error is due to an API key.
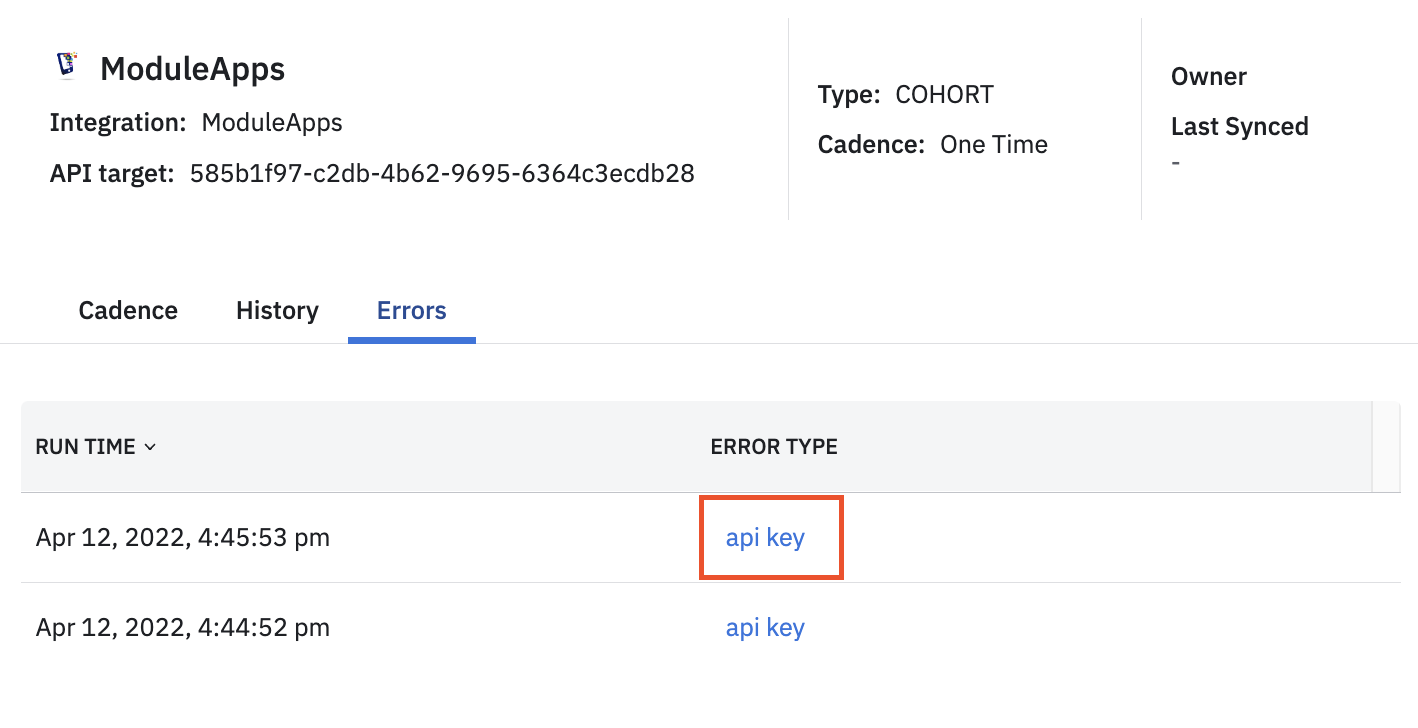
The user can click the error and read a full error message. This is a great place to explain the cause of and solution to an error.
How Amplitude handles undefined status codes
For any error response code that's "undefined" at the point of configuration (without failure reason or status code), Amplitude will by default show an "unclassified" error type with the following error message:
"This cohort sync has encountered an unidentified kind of error for this integration. Please contact support or your CSM to create a ticket and ask for help in solving this issue."
Add users endpoint
The add users API is called every time a cohort syncs from Amplitude to your app. This could be hourly or daily. This call calculates the difference in the current cohort size compared to the last successful sync.

- URL Endpoint: There is a
$list_Idplaceholder in the URL but it's not required. You can design your API to place this in the payload if you want, for example:https://your.domain/lists/$listId/add. -
API payload that to send to the destination: You can customize and define whether this payload is a batch. The important key here is the
$itemsvariable. The contents of An array of items that replaces the $items variable in the payload replace this variable. This$itemsvariable is usually the identifier for every user in a cohort. For example, there are 20 new users to add to your existing cohort. The Batch object contains a collection (a list of 20 users) so these 20 objects are sent to your endpoint. Your payload might look something like this:{ "userIds": $items, "context": { "integration":{ "name": "Amplitude Cohort Sync", "version": "1.0.0" } } } -
Maximum number of items in each API call (batch size): The default is 10,000, but you can specify this. Amplitude's recommendation is to have a 10,000 user per cohort batch.
- An array of items that replaces the
$itemsvariable in the payload: Specify the format of object that replaces the$itemvariable in the payload. For example,"$user_id_field_amplitude".
Avoid rate limiting if possible. If you do have rate limits, for example, 90 requests per second, make the them explicit in your user documentation. Amplitude sends out 4 requests in parallel with each request having up to 10,000 users.
Errors for add users endpoint
Instead of creating every single status code, failure reasons, error message, and sub error code again, Amplitude recommends using the same set of error codes from your list creation endpoint. Just select Copy errors from other endpoints and select an endpoint you've written errors for.
Remove users endpoint
The remove users API is called every time a cohort syncs from Amplitude to your app. This could be hourly or daily. This call calculates the difference in the current cohort size compared to the last successful sync.
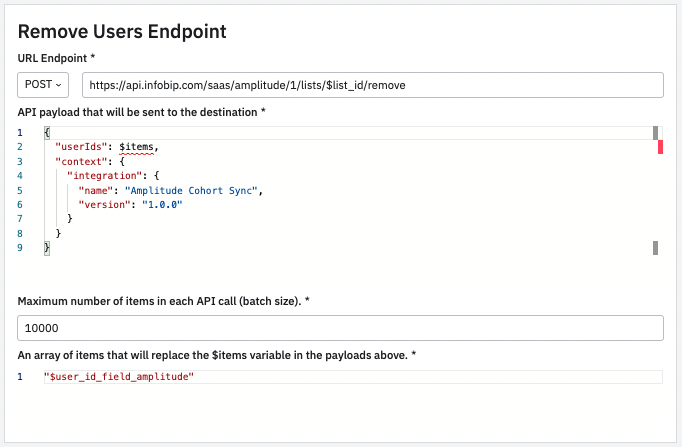
- URL Endpoint: There is a
$listIdplaceholder in the URL but it's not required. You can design your API to place this in the payload if you want, for example:https://your.domain/lists/$listId/remove. -
API payload to send to the destination: You can customize and define whether this payload is a batch. The important key here is the
$itemsvariable which is replaced by the contents of An array of items that replaces the $items variable in the payload This$itemsvariable is usually the identifier for every user in a cohort. For example, there are 20 new users to remove from your existing cohort. The Batch object contains a collection (a list of 20 users) so these 20 objects are sent to your endpoint. Your payload might look something like this:{ "userIds": $items, "context": { "integration":{ "name": "Amplitude Cohort Sync", "version": "1.0.0" } } } -
Maximum number of items in each API call (batch size): The default is 10,000, but you can specify this. Amplitude's recommendation is to have a 10,000 user per cohort batch.
- An array of items that replaces the
$itemsvariable in the payload: Specify the format of object that replaces the$itemvariable in the payload. For example,"$user_id_field_amplitude".
Errors for remove users endpoint
Instead of creating every single status code, failure reasons, error message, and sub error code again, Amplitude recommends using the same set of error codes from your list creation endpoint. Just select Copy errors from other endpoints and select an endpoint you've written errors for.
Preview & test endpoint
Before submitting your configuration for review, test the mock payload that you expect to receive from Amplitude. On the right side of the configuration page, follow these steps to preview and test your configuration.
Configure the test integration instance:
- Provide a valid Project ID in your organization for testing: Select your project.
- Name: Enter a name for the integration. This is just for testing this instance of the integration and doesn't change your integration's public name.
- API Key: Enter the API key from the Amplitude project.
- Key: Choose which Amplitude User Properties to map to your target ID.
Check the variables table to make sure all variables are accounted for and resolve any errors.
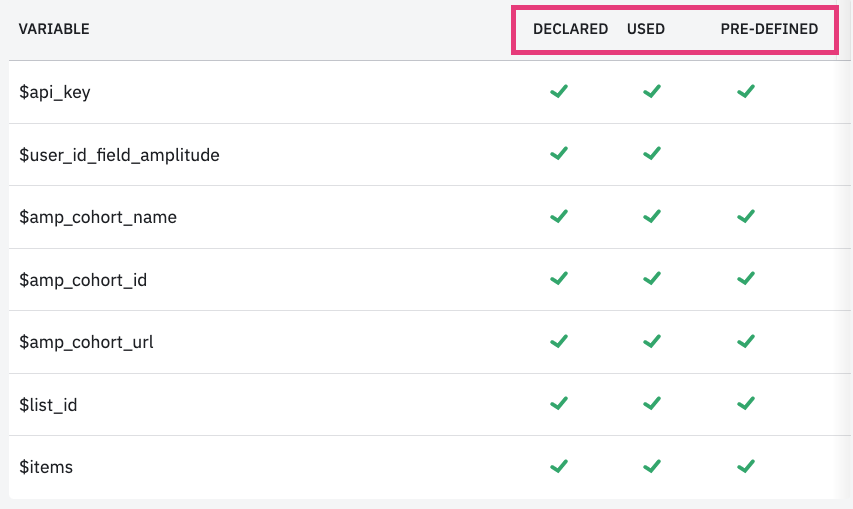
- DECLARED: All declared variables in the "Authentication calls, Custom Fields and Mapping Fields section"
- USED: All variables that are used either in the list users endpoint, add users endpoint, and remove users endpoint.
- PRE-DEFINED: There are some pre-defined variables that Amplitude replaces values for.
Check your headers and payloads and when ready, click Test Endpoint to send a test API call to the predefined endpoint. You can also see the response/error for easy debugging.
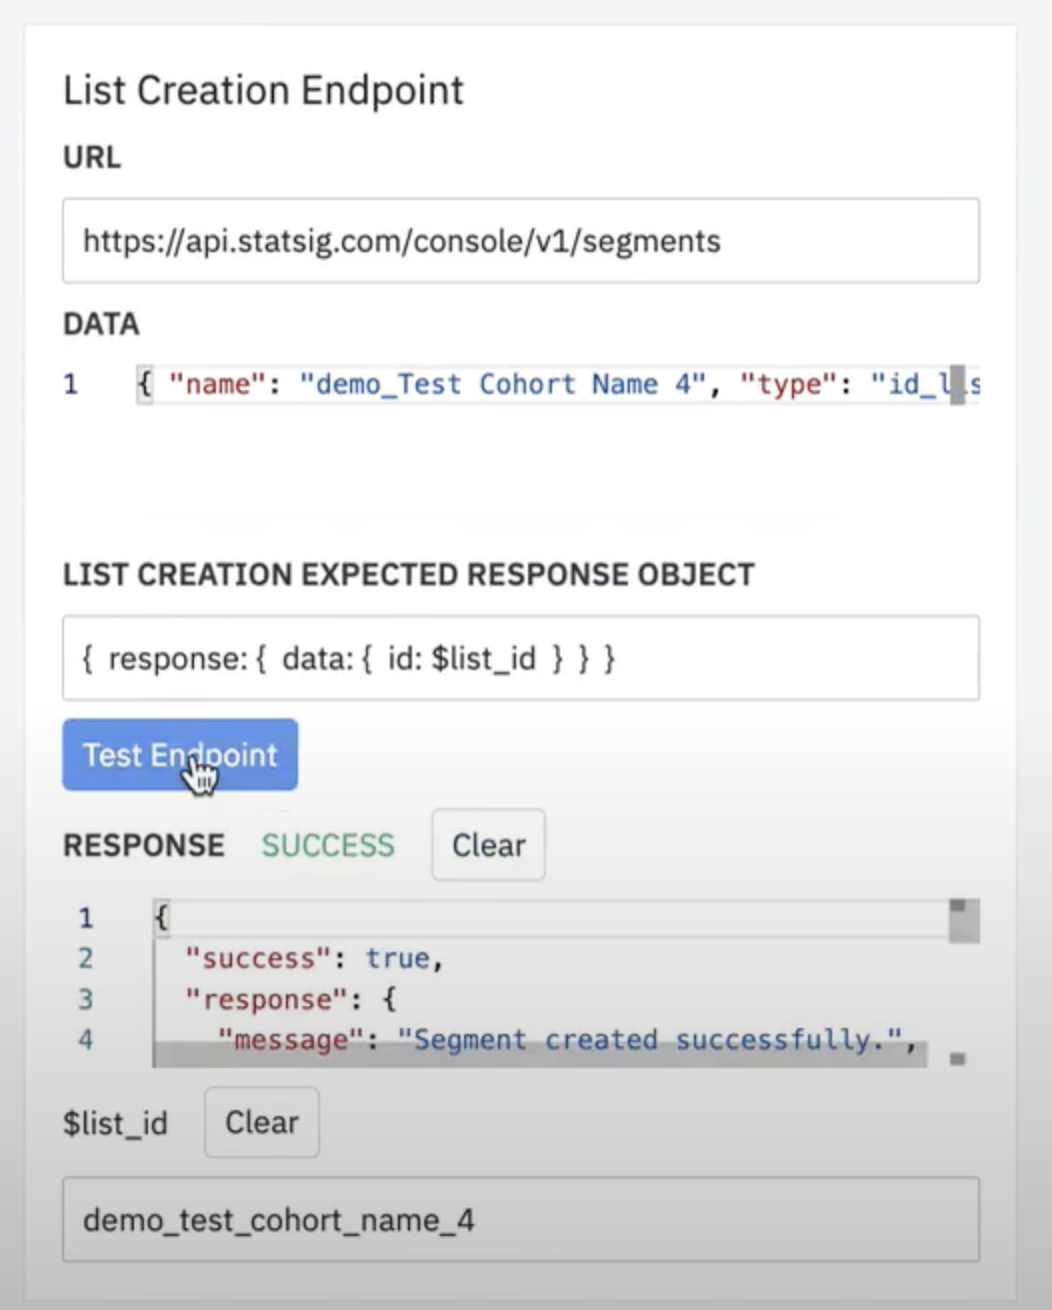
After you click Test Endpoint, you should get a success response. Retrieve the $list_id here and then Amplitude uses the $list_id for the "Add Users Endpoint".
The {listId: $list_id} is the expected response for list creation API call. To change the structure, change the Path to List ID in the response value in the list creation configuration.
Use the $list_id you retrieved to test the add to add users and remove users endpoints.
Submit your integration
After you have finalized your testing, click Submit to submit your integration to the Amplitude team. The review process should take about one week. When Amplitude approves you integration, you're notified via email and can see your integration tile in the Destination section of Amplitude.