Google Cloud Storage (GCS) Import
Amplitude's GCS Import feature lets you import event or user properties into your Amplitude projects from an GCS bucket. This article helps you configure this data source within Amplitude.
Feature availability
This feature is available in all accounts, including accounts with free plans.
Other Amplitude + Google Cloud Storage Integrations
This integration imports GCS data into Amplitude. Amplitude offers other integrations with Google Cloud Storage:
Getting started
Prerequisites
Before you start, make sure you’ve taken care of some prerequisites.
- Make sure you have a GCS service account with the appropriate permissions. Learn more.
- Make sure that an Amplitude project exists to receive the data. If not, create a new project.
- Make sure you are an Admin or Manager of the Amplitude project.
- Make sure your GCS bucket has data files ready for ingestion. They must conform to the mappings that you outline in your converter file.
- Make sure the data in your GCS bucket follows the format outlined in Amplitude's HTTP API v2 spec.
Create a GCS service account and set permissions
If you haven't already, create a service account for Amplitude within the Google Cloud console. This allows Amplitude to export your data to your Google Cloud project.
After you create a service account, generate and download the service account key file and upload it to Amplitude. Make sure you export Amplitude's account key in JSON format.
Add this service account as a member to the bucket you'd like to export data to. Make sure to give this member the storage admin role to make sure Amplitude has the necessary permissions to export the data to your bucket.
You can also create your own role, if you prefer.
Keep in mind that the export process requires, at a minimum, the following permissions:
storage.buckets.getstorage.objects.getstorage.objects.createstorage.objects.deletestorage.objects.list
Add a new GCS source
To add a new GCS data source for Amplitude to draw data from, follow these steps:
- In Amplitude Data, click Catalog and select the Sources tab.
- In the Warehouse Sources section, click GCS.
- Upload your Service Account Key file. This gives Amplitude the permissions to pull data from your GCS bucket. You can find the permissions you need to give to the GCS Service Accounthere.
- After you've uploaded the Service Account Key file, enter the bucket name and folder where the data resides.
- Click Next to test the credentials. If all your information checks out, Amplitude displays a success message. Click Next > to continue the process.
- In the Enable Data Source panel, name your data source and give it a description. (You can edit this information later, via Settings.) Then click Save Source. Amplitude confirms that you've created and enabled your source.
- Click Finish to go back to the list of data sources. If you've already configured the converter, the data import starts in a few moments. Otherwise, it's time to create your data converter.
Create the converter configuration
The final step in setting up Amplitude's GCS ingestion source is creating the converter file. Your converter configuration gives the integration this information:
- A pattern that tells Amplitude what a valid data file looks like. For example:“\w+_\d{4}-\d{2}-\d{2}.json.gz”
- Whether the file is compressed, and if so, how.
- The file’s format. For example: CSV (with a particular delimiter), or lines of JSON objects.
- How to map each row from the file to an Amplitude event.
The converter file tells Amplitude how to process the ingested files. Create it in two steps: first, configure the compression type, file name, and escape characters for your files. Then use JSON to describe the rules your converter follows.
Guided converter creation
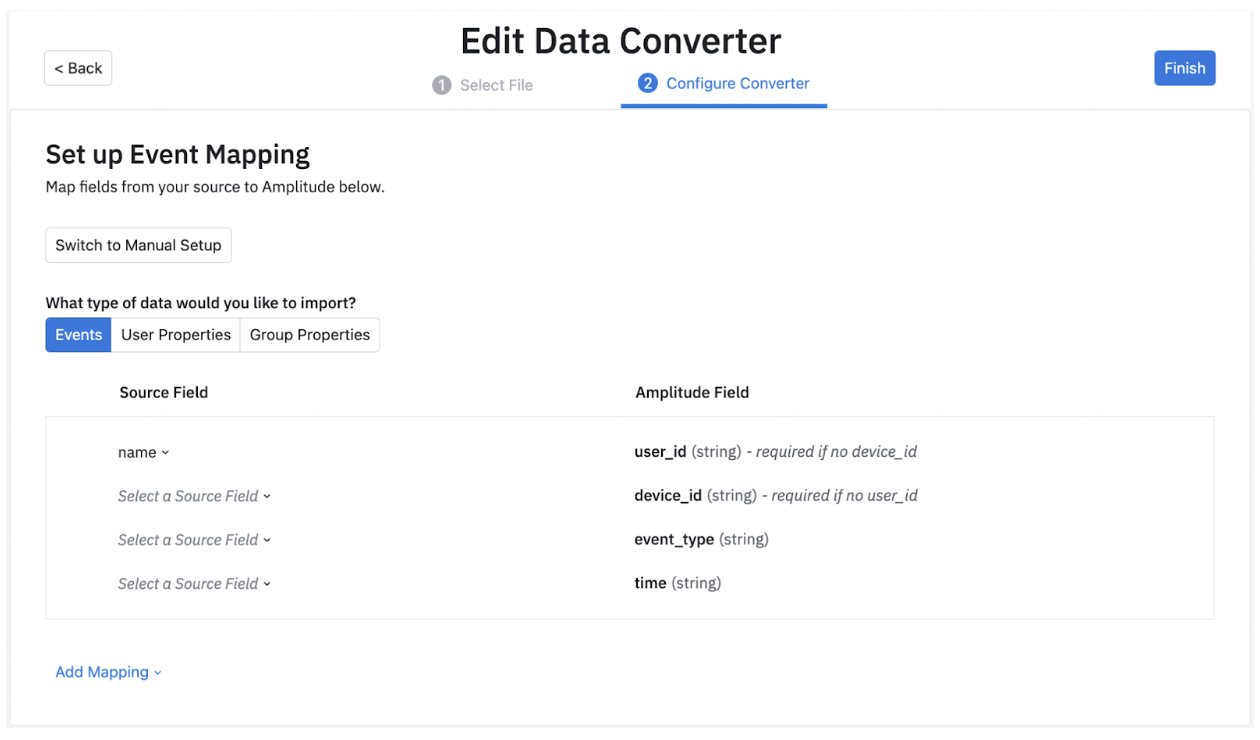
You can create converters via Amplitude's new guided converter creation interface. This lets you map and transform fields visually, removing the need to manually write a JSON configuration file. Behind the scenes, the UI compiles down to the existing JSON configuration language used at Amplitude.
First, take a look at the different data types you can import: Event, User Property and Group Property data.
Note
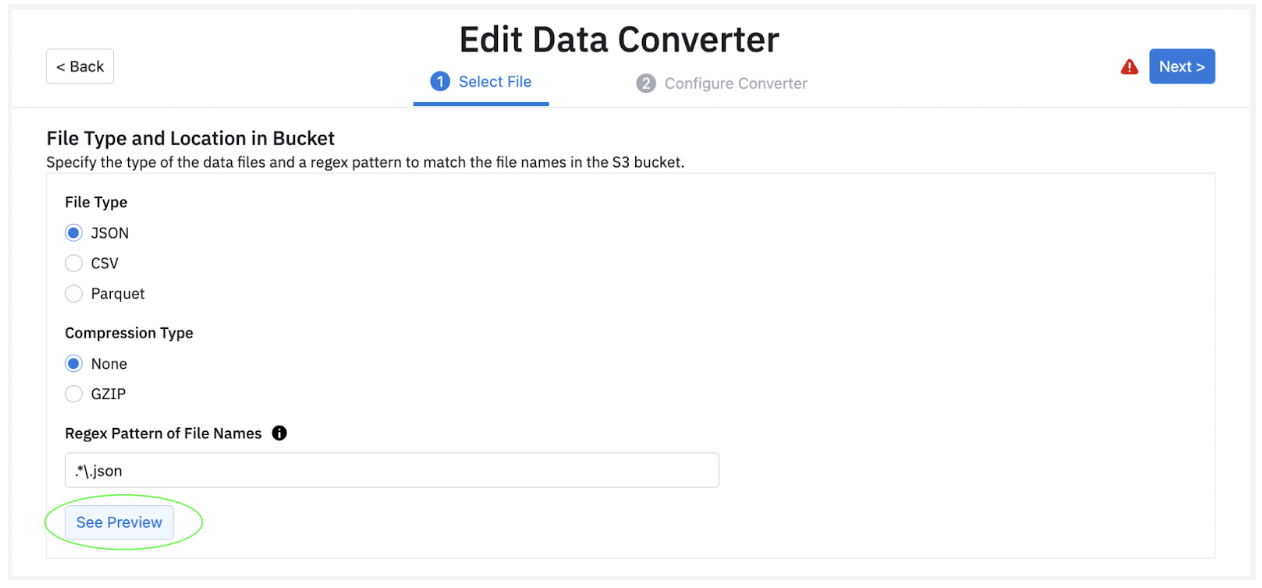
Amplitude recommends selecting preview in step 1 of the Data Converter, where you see a sample source record before moving to the next step.
After you have selected a particular field, you can choose to transform the field in your database. You can do this by clicking on "Transform" and choosing the kind of transformation you would like to apply. You can find a short description for each transformation.
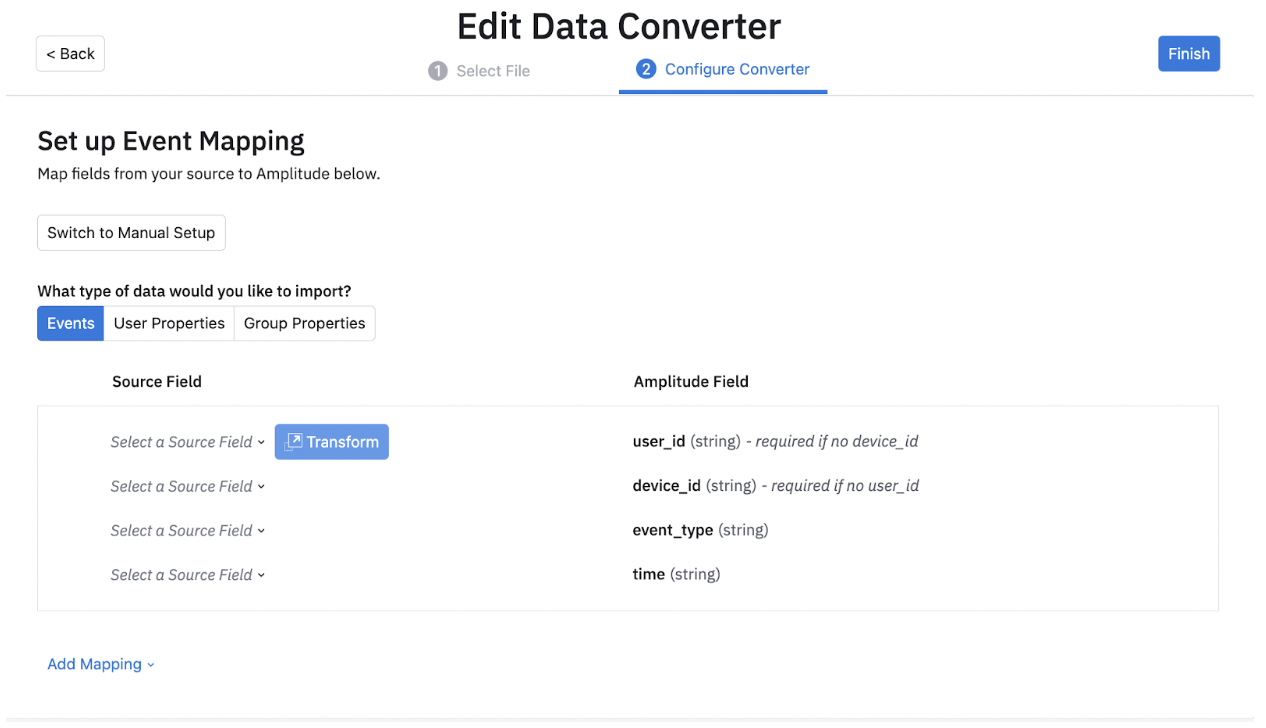
After you select a field, you can open the transformation modal and choose from a variety of Transformations.
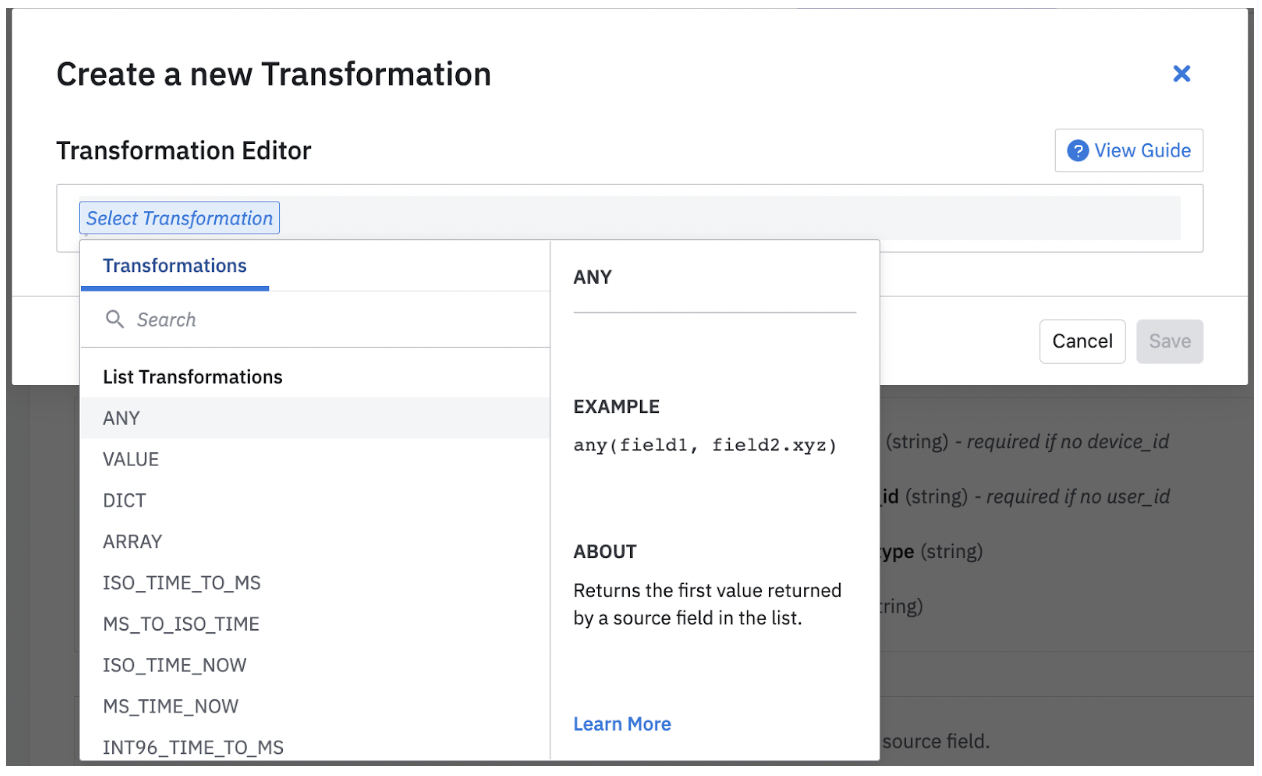
Depending on the transformation you select, you may be prompted to include more fields.

After you have all the fields needed for the transformation, you can save it. You can update these if your requirements change.
Although Amplitude needs certain fields to bring data in, it also supports extra fields which you can include by clicking the “Add Mapping” button. Here, Amplitude supports 4 kinds of mappings: Event properties, User Properties, Group Properties and Additional Properties.
Find a list of supported fields for events in the HTTP V2 API documentation and for user properties in the Identify API documentation. Add any columns not in those lists to either event_properties or user_properties, otherwise it's ignored.
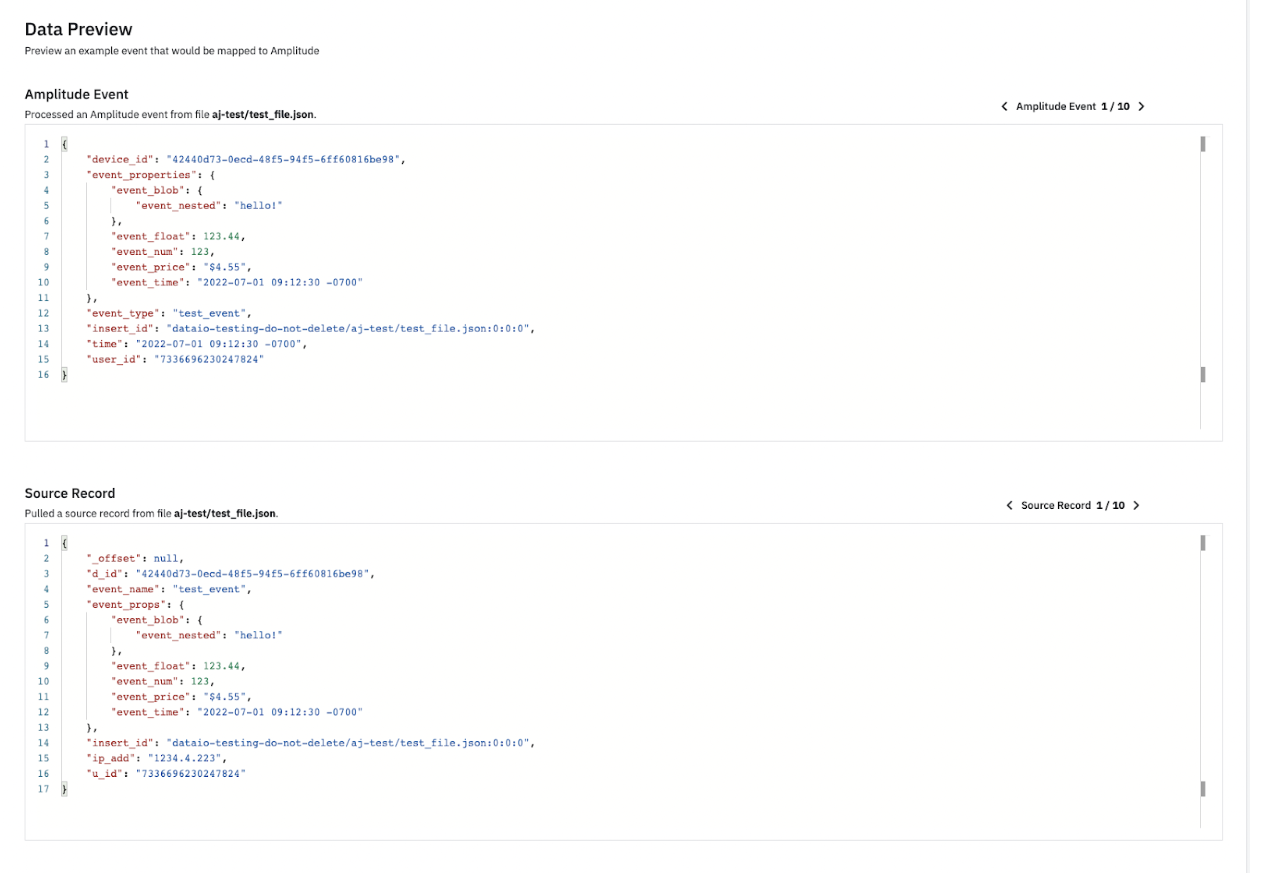
After you have added all the fields you wish to bring into Amplitude, you can view samples of this configuration in the Data Preview section. Data Preview automatically updates as you include or remove fields and properties. In Data Preview, you can look at a few sample records based on the source records along with how that data is imported into Amplitude. This ensures that you are bringing in all the data points you need into Amplitude. You can look at 10 different sample source records and their corresponding Amplitude events.
The converter language describes extraction of a value given a JSON element. Specify this using a SOURCE_DESCRIPTION, which includes:
- BASIC_PATH
- LIST_OPERATOR
- JSON_OBJECT
Example converters
See the Converter Configuration reference for more help.
Configure converter in Amplitude
- Click Edit Import Config to configure the compression type, file name, and escape characters for your files. The boilerplate of your converter file pre-populates based on the selections made during this step. You can also test whether the configuration works by clicking Pull File.
- Click Next.
- Enter your converter rules in the text editor.
- Test your conversion. Click Test Convert. Examine the conversion preview. Make adjustments to your converter configuration as needed.
- Click Finish.
Note
If you add new fields or change the source data format, you need to update your converter configuration. Note that the updated converter only applies to files discovered_after_converter updates are saved.
Storage organization requirements
After the initial ingestion, your data organization must conform to this standard for subsequent imports:
{bucket name}/{GCSPrefix}/{YYYY}/{MM}/{DD}/{HH}/{optional}/{additional}/ {folder}/{structure}/{file name}
where:
{bucket name}is the name of your GCS bucket;{GCSPrefix}is the source prefix folder specified in your source setup configuration;{YYYY}/{MM}/{DD}/{HH}is the required date prefix format to upload new files. You should organize files according to the time they're uploaded to the bucket, and not when the files are generated in your system. Also, you must always use two digits (as opposed to one) to represent the month, day, and hour;{optional}/{additional}/{folder}/{structure}is where you can add additional folder structure details. These details are strictly optional. If you do include them, an example file path might look like{bucket name}/{GCSPrefix}/{YYYY}/{MM}/{DD}/{HH}/**cluster-01/node-25**/{file name}.
Info
These organizational requirements apply only to new data you want to import after the source is enabled. You don't have to reorganize any pre-existing files, as Amplitude's GCS Import captures the data they contain on the first ingestion scan. After the initial scan, new data uploaded to the bucket must conform to the requirements outlined here.